OPS Network Partner Help Center
What are you looking for?
Welcome to the Online Policing Solutions Help Center. Here our OPS Network Partners will find valuable tools to assist them with using the OPS Network to its fullest potential. In order to use the Help Center, please locate the module or tool you are looking for assistance with and click on the field.
Video Tutorials
Click this box to view easy to follow video tutorials that feature many of the OPS Network features and functions.
Resett a New Password
Need to reset your password and cannot login. Click here to submit a request for a new password master reset.
Live Chat
Want to chat with an OPS Technical Representative now? Click this box to get started with your live technical assistance.
COMMAND CENTER CENTER HELP GUIDE
Choose the below subject to expand your knowledge base on how to navigate and utilize the OPS Command Center.
☞ Get Started - Set Up and Edit Your Agency Community Interface (Website)
1. Log in to your OPS Command Center.
2. Go to the “Community” tab located on the left sidebar menu. On this page, you will find the “Website” editor featured at the very top of the page, just above the Modules.
3. Click on the blue “Edit Settings” button.
4. Locate the editor menu located inside of the editor. Each tab represents a set of areas where the user can set up and edit the main features and pages on the website. No technical skills or knowledge is needed. Any authorized user can manage, setup and edit the Community Interface (website).
Tab 1 – Main Settings:
Set your agency’s main logo, address, phone and email. These items will show throughout the website and on the footer (bottom) of the website.
Click “Update Info”.
Tab 2 – About Page
Here you will set up your “About” page. Click on the area for the About image and add same (image must be at least 1200 X 500 pixels). Add your agency description and the Chief’s Message.
Click “Update Info”.
Tab 3 – News Categories
Here you will add the News Categories that users will choose when generating news article in the New Module. You can add as many as needed.
Click “Update Info”.
Tab 4 – Command Staff
This tab is used to simply put your Command Staff members, who are chosen to display on this page from the user setup field, in the order you wish them to be seen.
Click “Update Info”.
Tab 5 – Community Pages
Here you can add your “Community” pages. Community pages will display information about the different initiatives or programs your agency has such as Community Policing, PAL, Chaplin Program, Safe Streets, etc.. You can add as many pages and information as you like by filling in the required fields.
You can also feature up to five (5) of these pages on the front of your website. By arranging the sites on order, the first five (5) will be featured on the front page.
Click “Update Info”.
Tab 6 – Resource Pages
Here you can add your “Resource” pages. Resource pages are any pages you wish to share information with commuity such as agency visitor information, child safety informaiton, NARCAN Information, Domestic Violence Prevention TIPS, etc.. You can add as many pages and information as you like by filling in the required fields.
Click “Update Info”.
Tab 7 – Units Pages
Here you can add your “Units”. “Units” pages will display information about the different units in your agency.
You can also determine what order your Units pages will appear in by arranging them in order on the screen using the “up and down” arrows.
Click “Update Info”.
Tab 8 – Contact Pages
Here you can add your “Locations” page information. The “Locations” pages will display information about the various locations for your agency such as satellite offices or precincts. You can add as many locations as are appropriate.
You can also determine what order your Locations Pages will appear in by arranging them in order on the screen using the “up and down” arrows.
Click “Update Info”.
Tab 9 – Careers Page
Fill in the appropriate fields to populate your agency “Careers” page. Add an image and your recruitment description. This is where you add career listings as well. Add the career title, start and end date, description and add an application or link to application or civil service testing page. When the posting is over, delete the listing.
Click “Update Info”.
Tab 10 – Social Media Settings
Here you will add the links to your preferred social media pages. These links will appear as icons for users to click, from the agency website, to visit your social media platforms. Simply go to your social media sites, copy and paste the website address into these fields.
Click “Update Info”.
Tab 11 – Footer Links
Here you will add important links that you wish to display on your website’s footer (bottom of every page).
Click “Update Info”.
Tab 12 – Footer Resources
Here you will add links to important resources you wish to display on the your website’s footer (bottom of every page).
Click “Update Info”.
Congratulations! You have completed the setup of your agency’s Community Interface (website). You can use the “Editor” to change and edit your main features any time you need or want. No web skills or knowledge is needed.
☞ Formatting Your Main Agency Insignia/Logo
Agency Insignia Format
When setting up or editing your Community Interface (website), you will find a “Main Insignia” area where you can add your agency logo, which will be featured throughout your Community Interface. If your logo is already formatted properly, you simply click on the area for the logo, upload same and save.
If your logo is “cutoff” once loaded or does not fit properly, the below instructions will help you properly format your logo.
1. The agency insignia (or logo) must be a minimum of 300 X 300 pixels.
2. The image needs to be in .png format (transparent background)
3. The image must be in a “square” canvass (see example below). This means that the canvass the image is on must be square regardless of the image dimension. Any style or dimension insignia can be used as long as the canvass is square. It is recommended, but not required, that the image have some minimal spacing from the edge of the canvass.
4. The highest quality image should be used so that it looks professional and represents the agency well. Low resolution images or “pictures” of agency patches will often look blurry or unprofessional. It is recommenced that the agency have a professional graphic of their agency logo created if not available.
If an agency does not have their insignia or logo formatted as stated above, and does not know how to accomplish same, OPS technical support can format it for the agency.
Any image that is formatted properly can be used and changed as often as desired.

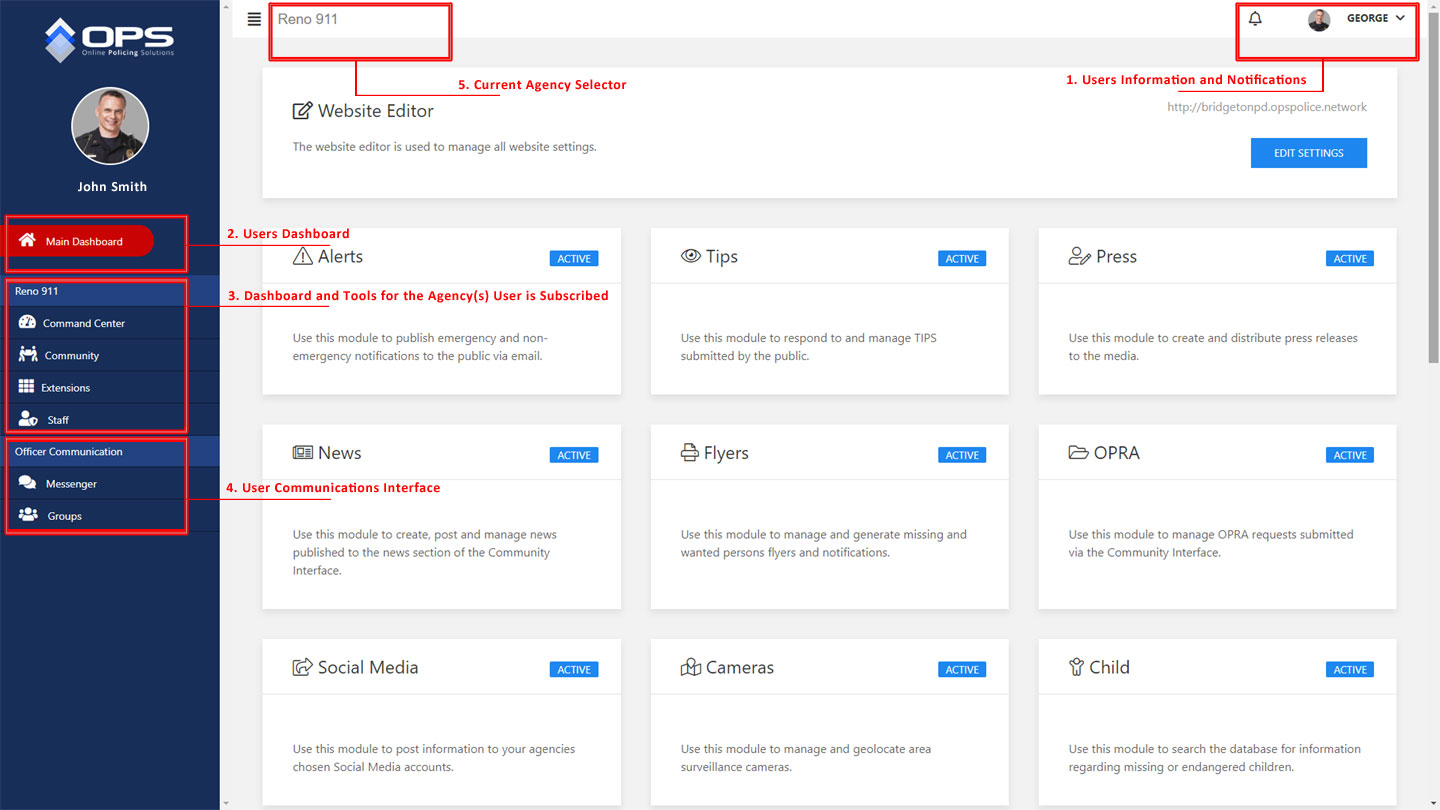
☞ Navigating the Command Center
Navigating the OPS Command Center is simple and easy. You have several parts that serve different purposes.
1. The user administration section.
Here the user can control their profile and view the agency’s they are subscribed to . The user will also use this area to find an agency and send a request to be invited into the agency’s network. In addition, the “bell” icon indicates if there are any pending messages for the user.
2. The Main Dashboard
This is the user specific OPS Network dashboard and is independent of any agency. This dashboard stays with the user no matter what agency(s) they are subscribed to and working from.
3. The Agency Interface
This is unique to the agency the user is logged into and the specific Agency OPS Network the user is subscribed operating from.
In this area the user will access the Agency Command Center, Community Modules and, if assigned Administrative Rights, the agency staff controls.
4. Communications Portal
Here the user can access the nationwide chat and communications platform.
5. Agency Selector
At the top of the screen, the user will see the agency they are logged in to. If a user is subscribed to more than one agency, this area, when clicked on, will allow the user to select the agency they wish to access.
There are many features of the OPS Network, but the above explains the basic layout of the OPS Network Interface. The below graphic may help users identify the parts listed above.
☞ Joining an Agency Procedure (User Level)
NOTE: Only sworn members or authorized civilian staff are authorized to request permission to join an agency network. Purposeful attempts to join agencies that users are not authorized to join or attempts to join agencies by non-law enforcement personnel will result in permanent suspension of the users OPS account, agency discipline and/or potential criminal penalties.
Step 1.
From the “Admin” drop-down, located under the users name at the top right screen on the Command Center, click on “Manage” under the “Agencies” label.
(Note: First time users can request to join thier primary agency during the initial registration, once they confirm thier email address, by clicking on “Take Me There” next to “Request to Join Agency”. From this screen, simply search and find your agency and click + Request next to the agency name.)
Step 2.
Go to the “Send a Request” tab and locate your agency by searching for same.
Step 3.
Click on the “+Request” button located to the right of the agency you wish to join.
Step 4.
Confirm your request by clicking “Send Request” on the confirmation pop up.
The agency will receive your request and, if accepted, will assign your rank, badge number and permission levels. The user will receive notification that they have been accepted into the agency.
Once accepted into the network, users will find the agencies that they are members of in the “My Agencies” tab under their user management area.
☞ Department Files
At the very top of your Command Center, you will find a tab labeled “Department Files”.

Click on Image to Enlarge
This tab is used for agency personnel to access agency documents and files they may need for daily tasks. These files may include Miranda Forms, Crime Scene Logs, Firearms Forms, etc… The purpose of the “Department Files” tab is to allow access to these important documents from anywhere, anytime.
To learn how to add documents to this tab, please see the instructions for “Department Files” in the “Setting Up Your Network” tab above.
☞ Command Center Links
On the right side of the Command Center, you will find a varity of blue buttons. These buttons are used to allow agency personnel to have a convenient access point for important links that they may need while at the agency or off-site. These links may include other cloud based reporting or CAD systems, investigative tools, emial and more.
Administrative Users can add, delete and modify these links by clicking on the three dots (…) located just above the blue link buttons. By clicking these dots, the link editor will open.
NOTE: As a user, if there are no blue buttons on the Command Center, this indicates that no links have been added by the administrator. If you feel a link should be added to this area, contact your agency OPS Administrator.
☞ Full Screen Mode (Patrol Ready)
At the very top of your Command Center, you will find a tab located to the left of the agency name. This tab looks like four verticle lines. This toggle switch is in place to allow users to expand the screen they are working on and hide the sidebar menu. This is what we refer to as “patrol ready mode” since its most useful enviroment would be on a smaller screens such as patrol MDT’s, mobile laptops and/or tablets that are too large to render mobile mode.
To use the “Full Screen Mode” simply click the button. To close the “Full Screen Mode”, click it again.
☞ Resetting A Password/Recovering a Lost Password
Under your user account profile dropdown, located on the upper right side of the screen, click on Account Settings.
Once on the Account Settings Screen, you can manage your agency email and password.
LOST PASSWORD
On the login screen, click on the “Forgot Your Password” link. You will recieve an email that will provide instructions on restting your OPS Password.
☞ Managing Users Accounts (Agency Level)
Inviting a User to Join Your Network
Step 1.
Click on the “Staff” link which is located on the left sidebar menu in the OPS Command Center.
Step 2.
At the top of “Staff” page, locate and click on the “Invite” tab.
Step 3.
You will now see a full list of all OPS Network registered users. Search for the user you wish to invite using the search bar located at the top right of the screen.
Step 4.
Once you locate the user, click on the “+Invite” button to the right of the users name.
Step 5.
A menu will appear on the right side of the screen. Enter the rank, badge number and system rights you wish to assign to the user you are inviting to join your network.
Step 6.
Click on the “Send Invitation” button.
Once the user receives this notification and accepts same, you will receive a notification in your command center that they have accepted your invitation. That user is now a member of your agency and nothing further is required.
Note: The “Pending” tab, located on the “Staff” page, will list all invitations that are pending. Initiation on this list will disappear once a user accepts or declines an invitation.
Accepting an Invitation by an OPS User to Join Your Agency
When a registered OPS user wishes to join your agency, they will send a request to your agency. From the OPS Command Center, the administrator (or authorized agent for the administrator) will receive a notification. This notification will appear on the upper right side of the Command Center screen as a notice next to the bell icon. A new request will also appear in the “Pending” tab located at the top of the “Staff” page.
To accept a new member request, follow the below instructions:
Step 1.
Locate the notification in the “Pending” tab on the Staff page or by clicking on the bell icon on the top of the page.
Step 2.
Click on the users name (under the bell icon) and confirm the user is a member of your agency or a person you wish to authorize to have access.
Step 3.
From the “Pending” tab, click “Accept”. You will be asked to confirm that you wish to accept the user into your OPS Network. If so, click “Accept”.
Step 4.
Proceed to your “Staff” page and locate the new member. Click on the edit icon to the right of the member to activate the “permissions” screen.
Step 5.
Assign the rank, badge number and permissions. Click “Update”.
You have now activated the new user and he/she is now a member of your OPS Network.
☞ Setting Up Permission Groups
- Click on the Staff tab located on the blue sidebar menu.
- Once you click the Staff Tab, you will see your listed staff.
- Click on Permission Groups.
- Once you click on Permission Groups, you will then find a list of pre-loaded Permission Groups. These Permission Groups are the most commonly used for most users. However, agency administrators can modify these or create any number of custom Permission Groups to suite your needs.
- To create a new Permission Group, click on the blue button labeled “Add a New Group”.
- Once you click on the blue button labeled “Add a New Group”, a menu will pop up. You can then name the group and set the rules for that group by expanding each part of the OPS Network section (Command Center, Community Access, Extensions, Staff). Each module, extension, staff access and the Command Center allow you to set:
- Create: User can add information to the tool or module.
- Read: User can read the information.
- Update: User can update existing information.
- Delete: User can delete information.
Example: Alerts Module – Create ✓ Read ✓ Update ☒ Delete ☒
In this example, the user would be able to create and read an Alert but would not be authorized to update an existing Alert or delete anything in the Alert Module.
-
Once you have created a Permission Group, click the white CREATE button. (To edit a Permission Group, click on the pencil icon next to the desired group and edit accordingly as described above.)
- Now that you have created a Permission Group, it will appear in your Permission Groups list.
☞ Setting Up Your Network
Agency Administrators Only
Setting up your OPS Network is simple and designed for any agency to quickly get their system up and running in no time by following the below steps. Note: Agency administrators can change, modify and alter these fields any time and have control of these set up fields.
- Find the “Manage Network Profile” link located under your agency name at the top of the Command Center screen. Once on the “Manage Network Profile” screen, add your basic agency information under the Info tab. This information will be viewed by other officers and agency members when they search the network and find your agency.
- Click on the About Tab. Here you will add some more detailed information about your agency such as history, links to directions, etc… This is an open text field so you can be as detailed as you wish.
- Click on the Photos Tab. The Photos tab allows you to upload galleries and images, if you wish, for other law enforcement visitors to view in order to get to know even more about your agency.
☞ Turning Modules On/Off
Once you enter a module, you will notice a toggle button at the top right side of the screen. When the toggle is blue, the module is active. Whent he toggle is grey, it is off. To turn the module off, so it is not seen on the Community Interface, simply click on the toggle button, so it slides over and turns grey, to turn it off. Click it again and the toggle will slide over, and turn blue, indicating the module is active on the website.

☞ Searching for an Agency
To search for an agency on the network, go to “Main Dashboard” in the OPS Command Center.
- Scroll down the page and locate the “Agencies” field.
- The newest 10 agencies will appear. Use the search function to find any OPS Partner Agency.
- Once you locate your agency, click on the name.
- The agency information will appear, to include About Informaition, Photos and a Agency Staff Roster (which can be searched as well for agency personnel).
☞ Searching for an Agency Member
To search for a member of your agency, go to “Main Dashboard” in the OPS Command Center.
- Scroll down the page and locate the “My Agencies” field.
- Cick on “View Agency Profile”.
- Click on the “Staff” tab.
- Scroll through the users or utilize the search function to locate the member.
☞ Searching for any OPS Registered Member
To search for an OPS Network User on the network, go to “Main Dashboard” in the OPS Command Center.
- Scroll down the page and locate the “New Users” field.
- The newest 10 users will appear. Use the search function to find any OPS Member (Searches can be by user name (first, last, first few letters etc..), agency, city, specialty and more.)
- Once you locate the member, click on the members image.
- The membersy information will appear, to include About Informaition, Photos and User Bio.
Throughout the Command Center, you will encounter several icons that are used for editing or navigating certain parts of the Command Center as well as the modules contain within.
Below are examples of these icons, what they indicate and what they are used for.
NOTES ICON
This icon indicates that the tool allows a note to be added for agency personnel.
VIEW MESSAGE ICON
This icon, when clicked on, will allow the user to view a message.
EDIT ICON
This icon indicates that the tool can be edited or modified. By clicking you can edit the field.
OPEN ICON
This icon indicates that the message can be re-opened after being closed.
CLOSE ICON
This icon indicates that the item can be closed. Clicking on same will close the item.
DELETE ICON
This icon indicates that the item can be deleted. Clicking on same will delete the item.
COMMUNICATION CENTER HELP GUIDE
Choose the below subject to expand your knowledge base on how to utilize the Messenger and Group functions of the Communications Center.
☞ Overview
The OPS Network includes a robust and secure Officer to Officer and Agency to Agency information sharing and communications network. All sworn users can utilize these assets to communicate, share information and stay connected like never before.
There are two key parts to the Officer Communications System within the OPS Network and these include the Messenger System and the Groups System. Below you will find detailed overviews of these systems and how to utilize same.
☞ Using Messenger
Using the OPS Network Messenger System is simple and effective. You can utilize the Messenger in numerous ways such as:
- Search for a user on your Main Dashboard and click on the blue “Send Message” button located on the top right side of the members biography page.
- Click on a users image anywhere it appears and follow above instructions.
- Click on the Messenger tab on the OPS Network sidebar and enter the OPS Network Messenger System.
In all of these scenarios, you can send secure messages and share images with any registered member of the network.
Note: Only Sworn Law Enforcement Officers who are actively attached to an active OPS Partner Law Enforcement Agency have access to the OPS Network Communcation tools.
☞ Managing and Using Groups
Within the OPS Network, members can create Groups that allow the sharing of information, ideas, strategies and many other things. Groups are great for networking and staying in touch. Groups can be used for anything from Association News to Operational Management. The uses are limitless.
Below you will find the basic information about how to create, join and manage Groups within the OPS Network.
Group Roles:
- Default: User can participate in the Group.
- Moderator: User has the authority to moderate comments.
- Admin: User has full admin rights to the Group.
Creating a Group:
Click on the blue “Create Group” located at the top of the “My Groups” screen, which will be the screen you will see when you click on the “Groups” tab on the main sidebar menu once logged into the OPS Network.
There are three fields required when creating a group:
- Group Image:
- Choose an image that will help identify your new group. Appropriate images are allowed. Any purposely inappropriate images will be banned from the network.
- Group Name:
- Choose the name for your group. Example: “State Narcotics Officers Group”
- Group Description:
- Give a brief and accurate description of your group. It helps to add the type of group to the description. Example: “This is a Public Group to discuss narcotics trafficking in the state.”
- Privacy Setting:
- Public Group: Anyone can find and join this type of group.
- Closed Group: Anyone can search and find the group but they have to be invited or request permission to be allowed in the group. The Admin User will approve all users for this type of group.
- Secret Group: This type of group cannot be found by searching and only invited members can have access. This type of group will only be seen by those approved and cannot be seen by anyone, including network admin users of OPS Employees. This is a completely secure and secret group setting good for confidential matters and investigations.
Joining a Group:
There are two ways to join a group. You can request to join a Group or be invited to join a Group by the Group Admin.
Requesting to Join a Group:
When you find the group you wish to join, you will see one of two icons on the right side of the group tag:
Globe Icon 🌐 : This icon indicates that the Group is Public and all members are welcome to participate.
Unlock Icon 🔓: This icon indicates that the Group is Closed and requires permission to join or participate. Click on the lock icon and click + Request to Join.
Once you Request to Join, the Admin of the Group will approve or deny same. If you are approved, you will get a notification and the Group will now show on your Groups page.
Inviting a Member to a Group
As an admin of a Group, you can invite members to any of your Groups, regardless of status type: Open, Closed or Secret.
- To invite a member, open the Group wish to invite them into and click on “Invite” at the top of the page.
- From the “Invite” page, you can locate member(s) you wish to invite by searching the network.
- Once you locate the member, click on the + Invite button next to their name.
- A menu will slide out from the right of the screen. Here you can choose the members role in the group. These roles include:
- Default: User can participate in the Group.
- Moderator: User has the authority to moderate comments.
- Admin: User has full admin rights to the group.
- Once you choose a role, click on the Send Invitation button.
- The member will receive a notification that they have been invited to join the Group.
- When the member accepts, the Admin will be notified and the user will now appear on the Groups Members Page.
Note: Only Sworn Law Enforcement Officers who are actively attached to an active OPS Partner Law Enforcement Agency have access to the OPS Network Communcation tools.
MODULE TUTORIALS
Choose the below subject to expand your knowledge base on the individual modules within the OPS Network.
☞ Modules Overview
For technical clarity, a module comes from the modular programming paradigm which advocates that software should be composed of separate, interchangeable components called modules. Modules work by breaking down the main program functions into individual parts, each of which accomplishes one function and contains everything necessary to accomplish this. Simply put, it is the most effective way to design a multiple tool solution, like OPS, to work as one fluid system with unlimited options.
Every OPS Network includes numerous modules. Each module serves a specific task within the system and is accessed by the public via the Community Interface and by agency personnel via the OPS Command Center.
☞ Alert Module
This module is used to submit public alerts to citizens that have signed up on the Community Interface to receive them to their prescribed email system.
Announcement Title Field:
This field is used to add the title to your public announcement or alert. Example: “Bridge Closed on High Street” “Armed Suspect on the Loose”
Announcement Message:
This is the body of the message. Add the information you would like to share.
Once both fields are complete, the user can then choose if they want to also share this information on social media, with the press or add the announcement to the alert banner on the Community Interface. By simply choosing any of the options, the information will be shared with those outlets when the message is published.
ALERT BANNER: If the user selects the Alert Banner button, when they publish the announcement or alert, not only will it be sent to the public, same will appear on the Community Interface as a public alert which can be viewed by anyone using the Community Interface. It is recommended that only critical incidents, missing persons or matters that have a public safety risk be added to the Alert Banner. To frequent use, when the matter is not an emergency, will reduce the Alert Banners effectiveness.
To send the message, simply press the “Publish” button.
☞ Anonymous TIP Module
The TIPS System allows community members to submit TIPS anonymously via the Community Interface (website).
From the Command Center navigate to the TIPS Module. From this screen you will find the list of submitted TIPS.
TIPS listed in RED indicate that the TIP has not yet been responded to or had any action taken on it. Once an officer responds to the TIP or adds an Agency Note, the TIP will not longer appear RED.
Each TIP has the following options:
1. Assign the TIP to yourself or another listed user by clicking the pencil and paper icon. In this field you can also change the TIP title to make it easier to remember.
2. Add a note by clicking on the notes icon. Notes are for internal use only and are not seen by the Tipster. Any logged in member can add a note.
3. View the message by clicking on the speech icon. Here you can read the TIP and respond.
4. You can “Close” and “Open” a TIP by clicking on the round arrow icon. Once a TIP is closed, it can always be re-opened. NOTE: When Closing a TIP, you may have to refresh your screen since the system is closing the TIP and will lock the system momentarily to ensure you do not close more than one TIP inadvertently.
5. View your assigned TIPS by clicking on the “My Assigned TIPS” button. Here you will find a list of TIPS assigned to you.
The OPS TIP System is an interactive system and allows tipsters to create a 4-digit pin number when submitting a TIP. When the TIP is submitted, the system will generate a random code. This code, along with the 4-digit pin number, will allow the tipster to view your return messages and continue the conversation indefinitely.
The tipster can also upload images and files via the “Image and File Upload” area.
Anytime a TIP that you are assigned receives a new message, you will be notified via the OPS Command Center notification bell, located at the top of the OPS Operating System Screen. Simply click in this message to view the new TIP and continue the conversation.
☞ Camera Module
Your content goes here. Edit or remove this text inline or in the module Content settings. You can also style every aspect of this content in the module Design settings and even apply custom CSS to this text in the module Advanced settings.
☞ Child Database module
Module Currently Under Development.
☞ Commendation Module
Module Pending Deployment.
☞ Community Documents Module
The Community Documents Module allows agencies to upload an endless number of important documents via the Command Center to appear on the Community Interface. The public can then view and download these documents.
Find the Community Documents Module by clicking on the Community Tab in the OPS Command Center. Find the module labeled “Documents” and click on same. Once inside, you will see the list of loaded Documents. To add and manage documents:
Categories:
In this tab, the user can create the categories for the documents that will be uploaded. Example: Internal Affiars Annual Reports, Program Documents, Public Forms, etc..
New Document Button:
When a user clicks this button, they will then:
- Choose a category for the document.
- Name the document.
- Give the document and brief description.
- Upload the document and click save.
The document will now appear on your main documents page and within the category on the Community Interface/website’s Documents page.
Note: To change the order of the categories, as they appear on the Community Interface/website’s Documents page, go to Catergories in the Documents Module and then use your mouse to change the category order. When the “Save Page Order” button is clicked, the new order will appear to the public.
☞ Cold Case Module
Module Currently Under Development.
☞ Criminal Complaint Module
Module Currently Under Development.
☞ Internal Affairs Module
Module Currently Under Development.
☞ LIVE PD Module
Module Currently Under Development.
☞ Missing and Wanted Persons Flyer Module
The OPS Missing/Wanter Persons Flyer Module is an easy to use tool to quickly create and distribute flyers for missing and wanted persons.
Go to the Community Tab in the OPS Command Center and then find the Flyers Module and click on same. When you first access the module, you will the master list of all generated flyers.
Creating a Flyer:
- Click on either the Wanted or Missing tab (dependant on what type of flyer you wish to generate).
- Click “Create a Flyer”
- Complete the required fields.
- Click create.
The flyer will automatically show on the Community Interface/website in the appropriate location and be added to the mast list in the Command Center. The user can also choose to share the flyer on social media or print same.
☞ News Module
Your content goes here. Edit or remove this text inline or in the module Content settings. You can also style every aspect of this content in the module Design settings and even apply custom CSS to this text in the module Advanced settings.
☞ OPRA Module
Module Currently Under Development.
☞ Pawn Module
Module Currently Under Development.
☞ Press Release Module
The Press Release Module is designed to do the following:
- Allow agencies to easily create and distribute Official Press Releases to their Community Interface.
- Allows Press Corps and members of the media to subscribe to receive Official Press Release PDF’s sent diretly to them.
- Distribute PDF “Official” Press Releases to the media.
- Allow instant sharing of Press Releases to social media platforms.
All of the above is done automatically once set up and is a convenient and efficient way to get important news and announcements out to the public.
Creating a Letterhead Template:
To create a Press Release Letterhead, you have numerous options.
- Go to the Press Module in your Command Center.
- Choose “View Letterheads” and then choose “Create Letterhead”.
- When creating a Letterhead, the first field will ask you to give your Letterhead a title. This title will be used to identify the Letterhead you wish to use when generating a Press Release.
- Now select a template. There are two options:
- Choose nothing and start from scratch.
- Choose the pre-formatted template and modify to fit your needs.
- The pre-formatted templates are standard templates and by replacing the images and text, you will have a basic Letterhead to be used when creating a Press Releases.
- If you choose no template, you can create a custom Letterhead to your liking by doing one of the following:
- Add your images, text and logo to design your Letterhead (much like creating a Word document).
- Scan and save your agency Letterhead as an image and paste at the top of the editor. You can then add “Press Release” under the image, or any additional text you prefer.
- Once you are satisfied with you Letterhead click “save” (you can create as many as you like).
Creating a Press Release:
- Go to “View Press Releases”.
- Click on “Create Press Release”
- From here, you can choose to “Upload a File” (which will allow you to upload a pre-completed PDF Press Release from a file) or “Build a Press Release” (which allows you to easily generate your Press Release right from the OPS Press Release Module).
Build a Press Release
Step 1 – Add your Press Release Title.
Step 2 – Choose your Letterhead Template (as described above).
Step 3 – Add the body of your Press Release.
Upload a File
Step 1 – Add your Press Release Title
Step 2 – Upload the PDF file.
You will see that at the bottom of your “Create Press Release” text area, there are social media icons. By clicking on these icons, the Press Release will automatically be shared on these platforms once published.
Once you have completed one of the above, you can then choose to “Preview” your Press Release, Save it for future publication or “Publish”. Once published, the OPS Network will take care of posting it to your Community Interface and chosen social media accounts as well as distributing it to your Press subscriber list.
Sharing and Collaborating
Agency members, and members from other agencies with permission, can easily collaborate, review, modify and approve Press Releases as a group. To collaborate on a Press Release:
Step 1 – Follow the above procedure to “Build a Press Release”.
Step 2 – Using the internal OPS text editor, create the main text for your Press Release.
Step 3 – Save your Press Release.
Step 4 – Using the internal OPS messenger, notify the collaborating parties that you have created a Press Release and advise them of your instructions (review, modify, approve, etc…) Of course, each agency can devise thier own procedure.
EXAMPLE MESSAGE: “I have created a Press Release regarding the Community Picnic. Joe, Lisa and Rob, please review and modify it as needed. Joe, please review first and advise Lisa when complete. Lisa, please advise Rob when you are complete. Rob, let me know once you are done and I will complete the Press Release and publish.”
Step 5 – Each member can then enter the Press Module and interact with the Press Release. They can make additions, strikethoughs on existing text items to remove, etc… Additions should be highlited in red, while removals should be strikethoughs. in order for the next collaborater to see the changes easily. All of these tools are provided in the internal OPS text editor. Each collaborator simlpy saves the Press Release once complete.
Step 6 – Each collaborating member can then see the changes, add to them or appove them. Open discussion is easy via the direct messenger.
Step 7 – Once all collaborators are done reviewing, the original author can then accept the changes by removing the red changes and strikethroughs, etc..
Step 8 – With approval, any member can also Publish the Press Release at anytime.
With a little practive, internal and external agency members can easily collaborate on a Press Release.
That is it! Once set up, the OPS Press Release Module will save you time, allow you to engage your media and community and connect you like never before.
☞ Property Check Module
Module Currently Under Development.
☞ Public Report Ordering Module
Module Currently Under Development.
☞ Recruitment Module
The Recruitment Module allows agencies to setup a Recruitement/Careers page and then easily create career and job postings. Unlike most modules, which can be found as stand alone tools under the Community Tab in the OPS Commmand Center, the Recruitment Module is embedded into the Website Editor under the “Careers Page” tab. The reason for this is so that agency admins can easily post job listings and at the same time adjust the Recruitment Information portion of the page if needed.
To add a job posting:
- Go to the Community Tab in the Command Center.
- Open the Website Editor.
- Locate the Careers Page tab and click on same.
- You will see the main image and page exlpanation areas where you can set up the Rcruitment Page.
- Under these fields, click on the blue button labeled “Create New Posting”.
- You can now complete the fields to add a job posting. You can create as many as needed and they will appear on the Recruitment Page on your website, which can be found by clicking on the Careers tab on the top menu bar of you Community Interface.
When creating a job posting, the user has the option to upload a PDF for the applicant to download. Thier is also an option to add an external link to another online application, such as a statewide civil service page. Each post allows the user to use both the PDF button and link button at the same time, seperately or not at all.
☞ Resource Links Module
The Resource Links Module allows agencies to share a library of usefull links for the communtiy. From links to social services, other law enforcement, county, state, federal and city governemnt resources, shelters, etc….
Find the Resource Links Module by clicking on the Community Tab in the OPS Command Center. Find the module labeled “Links” and click on same. Once inside, you will see the list of loaded links. To add and manage links:
Categories:
In this tab, the user can create the categories for the links that will be shared. Example: Social Service Programs, Law Enforcement Agencies, Homeless Shelters, etc..
Create New link button:
When a user clicks this button, they will then:
- Choose a category for the document.
- Name the Link.
- Add the link url (web address).
The Link will now appear on your main Links page and within the proper category on the Community Interface/website’s Links page.
Note: To change the order of the categories, as they appear on the Community Interface/website’s Links page, go to Catergories in the Links Module and then use your mouse to change the category order. When the “Save Page Order” button is clicked, the new order will appear to the public.
☞ Schools Module
Your content goes here. Edit or remove this text inline or in the module Content settings. You can also style every aspect of this content in the module Design settings and even apply custom CSS to this text in the module Advanced settings.
☞ Social Media Module
Module Currently Under Development.
☞ Training Module
Module Currently Under Development.
Throughout the Command Center, you will encounter several icons that are used for editing or navigating certain parts of the Command Center as well as the modules contain within.
Below are examples of these icons, what they indicate and what they are used for.
NOTES ICON
This icon indicates that the tool allows a note to be added for agency personnel.
VIEW MESSAGE ICON
This icon, when clicked on, will allow the user to view a message.
EDIT ICON
This icon indicates that the tool can be edited or modified. By clicking you can edit the field.
OPEN ICON
This icon indicates that the message can be re-opened after being closed.
CLOSE ICON
This icon indicates that the item can be closed. Clicking on same will close the item.
DELETE ICON
This icon indicates that the item can be deleted. Clicking on same will delete the item.
COMMUNITY INTERFACE HELP GUIDES
Choose the below subject to expand your knowledge base on how to navigate and utilize the OPS Community Interface.
☞ Community Interface Overview
OPS starts with the Community Interface. This is the face of your OPS system and serves as the portal that the public will interact with. It is 100% responsive and works on all devices, from computers to tablets to mobile smartphones.
Here each department will present basic information to the public such as contact information, agency structure, news and more. This is also where the public will find the easy to navigate modules and tools that they will interact with and utilize.
☞ Getting Started
Your content goes here. Edit or remove this text inline or in the module Content settings. You can also style every aspect of this content in the module Design settings and even apply custom CSS to this text in the module Advanced settings.
☞ Navigation
Your content goes here. Edit or remove this text inline or in the module Content settings. You can also style every aspect of this content in the module Design settings and even apply custom CSS to this text in the module Advanced settings.
☞ Social Media Links
Your content goes here. Edit or remove this text inline or in the module Content settings. You can also style every aspect of this content in the module Design settings and even apply custom CSS to this text in the module Advanced settings.
☞ Press Corp Submissions
Your content goes here. Edit or remove this text inline or in the module Content settings. You can also style every aspect of this content in the module Design settings and even apply custom CSS to this text in the module Advanced settings.
☞ Using the Report Ordering System
Your content goes here. Edit or remove this text inline or in the module Content settings. You can also style every aspect of this content in the module Design settings and even apply custom CSS to this text in the module Advanced settings.
☞ Community Member User Creation and Management
Your content goes here. Edit or remove this text inline or in the module Content settings. You can also style every aspect of this content in the module Design settings and even apply custom CSS to this text in the module Advanced settings.
☞ Utilizing the TIP System
Your content goes here. Edit or remove this text inline or in the module Content settings. You can also style every aspect of this content in the module Design settings and even apply custom CSS to this text in the module Advanced settings.
☞ Submitting Cameras
Your content goes here. Edit or remove this text inline or in the module Content settings. You can also style every aspect of this content in the module Design settings and even apply custom CSS to this text in the module Advanced settings.
☞ Adding a Child to the System
Your content goes here. Edit or remove this text inline or in the module Content settings. You can also style every aspect of this content in the module Design settings and even apply custom CSS to this text in the module Advanced settings.
☞ Public Alert Sign Up and Notification
Your content goes here. Edit or remove this text inline or in the module Content settings. You can also style every aspect of this content in the module Design settings and even apply custom CSS to this text in the module Advanced settings.
EXTENSIONS HELP GUIDES
Choose the below subject to expand your knowledge base on how to navigate and utilize the OPS Community Interface.
☞ Extensions Overview
OPS starts with the Community Interface. This is the face of your OPS system and serves as the portal that the public will interact with. It is 100% responsive and works on all devices, from computers to tablets to mobile smartphones.
Here each department will present basic information to the public such as contact information, agency structure, news and more. This is also where the public will find the easy to navigate modules and tools that they will interact with and utilize.
☞ Chain of Command Extension
Your content goes here. Edit or remove this text inline or in the module Content settings. You can also style every aspect of this content in the module Design settings and even apply custom CSS to this text in the module Advanced settings.
☞ Equipment Management Extension
Your content goes here. Edit or remove this text inline or in the module Content settings. You can also style every aspect of this content in the module Design settings and even apply custom CSS to this text in the module Advanced settings.
☞ Firearms Management Extension
Your content goes here. Edit or remove this text inline or in the module Content settings. You can also style every aspect of this content in the module Design settings and even apply custom CSS to this text in the module Advanced settings.
☞ Fleet Management Extension
Your content goes here. Edit or remove this text inline or in the module Content settings. You can also style every aspect of this content in the module Design settings and even apply custom CSS to this text in the module Advanced settings.
☞ Law Enforcement Identification Extension
Your content goes here. Edit or remove this text inline or in the module Content settings. You can also style every aspect of this content in the module Design settings and even apply custom CSS to this text in the module Advanced settings.
☞ Operational Planning Extension
Your content goes here. Edit or remove this text inline or in the module Content settings. You can also style every aspect of this content in the module Design settings and even apply custom CSS to this text in the module Advanced settings.
☞ Schools Extension
Your content goes here. Edit or remove this text inline or in the module Content settings. You can also style every aspect of this content in the module Design settings and even apply custom CSS to this text in the module Advanced settings.
☞ Time Management Extension
Your content goes here. Edit or remove this text inline or in the module Content settings. You can also style every aspect of this content in the module Design settings and even apply custom CSS to this text in the module Advanced settings.
OPS LOGOS
Below are print and online ready versions of the OPS logo for use on any agency promotional material or during events.


For immediate technical assistance, please call the OPS Tech Hotline at 888-474-5757, Ext. 8.
You can also contact your Regional Representative or use the below form for non-critical technical assistance or inquiries.